Saturday, 20 December 2014

Erlang Project Ideas

When I started erlang, I had a hard time thinking of ideas for projects to improve my skills. Now I have way too many ideas to possibly implement Myself. Since I actually want these projects to exist so I can use them (everlasting glory coming secondary to some handy tools) I have written them up here. Feel free to try them out. I'm open to questions and suggestions.

swagger for erlang

swagger is a JSON spec for REST APIs. Once you have written a spec in swagger, it can generate documentation (demo) and REST handlers.

An erlang swagger library should take swagger specs and generate cowboy_rest handlers for them.

Difficulty: low

pretty print stack traces in lager

lager writes logs to files and pretty_errors pretty prints stack traces, a perfect match!

Modify the lager formatter to pretty print errors as shown in the pretty_errors project page.

Difficulty: low

edoc manpage generator (fempage?)

Looking up erlang manpage doc using editor plugins such as sublime-erlyman is much more responsive than web documentation. It would be great to be able to lookup docs for my own code and deps using manpages. The edown project is a good place to start for edoc integration.

Difficulty: low/medium

OTP standard library expansion

The erlang library is quite minimal. When coding list and binary operations I always have to roll my own implementations for the same functions:

  • lists:unique/1 remove duplicate elements in a list, preserving order.
  • lists:interpolate/2 Insert a term inbetween each element in the list. The type of the list elements or the the term inserted between is not checked, the result is a proper (flat) list unless the element inserted was also a list e.g. [a,x,b,x,c] = lists:interpolate(x, [a,b,c]).
  • binary:to_lower Convert upper case ascii in a binary to lower case.
  • binary:to_upper Convert lower case ascii in a binary to upper case.
  • binary:trim Standard left/right/both trim functions for binary strings.
  • binary:ends_with Check if a given binary ends with another binary true = binary:ends_with(<<"hello">>, <<"llo">>) It is simple to find if a binary starts with certain data using the binary matching syntax, it is a few more lines if you need to know if a binary ends with another binary.

Difficulty: medium

Difficulty is considered per function. It is relatively straightforward to get to grips with the OTP code for lists, the binary module involves much more c code so could be easier or more difficult depending on your experience.

Remember to add tests and documentation.

UI for dbg module (erlyberly)

One of the biggest misnomers about erlang is that the debugger doesn't work and programmers never use it anyway. I haven't had a great experience with the erlang graphical debugger but the dbg module is far better once you get used to it and can be used on running systems in test or production environments.

It would be handy to have a UI that connects as a remote note, presents a tree of modules and functions and allows you to set dbg traces on them and present you with those traces. It should be possible to do a text search on those traces as well.

I have made a start on this project at https://github.com/andytill/erlyberly.

Difficulty: medium

Parse Transform for alternate guard syntax

I don't like the syntax for guards. For me, it is far more inelegant than other erlang language constructs. For example:

my_func(Value) when is_binary(Value) ->
    ok.

This is just one guard, if you check more than one argument they can quickly stack up. Now compare this to binary syntax:

<<Length:32, _/binary>> = Value.

I find this is as elegant as it could possibly be. The /type is particularly nice, why not apply it function arguments?

my_func(Value/binary) ->
    ok.
    
% not just for binaries!
    
my_func2(Value/atom) ->
    ok.

This is very understandable to me, and looks like other erlang syntax I am used to dealing with. The two pieces of code would be equivalent, the proposed syntax just a shorthand for the guard. The syntax doesn't have to handle the more complicated guards just the type checks which are most common anyway.

I have made a start on this, it isn't as difficult as I imagined. See the ohmyguard project here.

Better record field access

Record syntax is very very bad. They are verbose and duplicated code is everywhere. Having to unpack the variables or need to express the record type is not required in any other language I have seen. For example:

State#state.my_field
#state{ my_field = MyField } = State

How I think it should work is if I can prove to the compiler than a variable is one record type then the fields should be directly accessible. For example:

my_func(State) when is_record(State, state) ->
    State.my_field.

The compiler would know that in this example the function body could not be executed if State was not the state record, so it is safe to infer the type of record.

How would it look if it was combined with the alternate guard syntax proposed above?

my_func(State/#state) ->
    State.my_field.

erlang records are starting to look good! These two features are completely separate, but complementary.

Update: this already exists as a parse transform, check out the recless project. This is hosted on Google code so expect it to move in the next few months.

Wednesday, 12 November 2014

Probability of Project Success

Quiz

There are ten tasks in a project and they all need to be completed within their estimate for the project to be delivered on time. Each task has a 10% chance that is mis-estimated and will take longer.

What is the probability that the project will be delivered on time?

If a task has a 10% chance of being late it has a 90% (0.9) probability of success. Probability of multiple events is calculated by multiplying all the probabilties: 0.9 * 0.9 * 0.9 etc. In the contrived example where all probabilites are the same we can do a simple power of:

Eshell V5.10.2  (abort with ^G)
1> math:pow(0.9, 10).
0.3486784401000001

The total probability of the project being delivered on is 34.8%, pretty bad eh?

Saturday, 27 July 2013

Erlang Dev Environment

I have started a tutorial on how to setup a professional development environment for erlang coding.  The github page below has better formatting.

https://gist.github.com/andytill/6094931

Erlang Dev Environment

This tutorial is aimed at a Windows user looking to start with erlang, it will help you set up an effective development environment, without proper tooling erlang seems underpowered. After all you wouldn't write java code in notepad.

Install Ubuntu on VirtualBox

Save yourself some time early on and just use linux for erlang development. Erlang does work on windows but most testing of the SDK, open source libraries and tools gets done on linux so things just seem to go more smoothly in this environment.

Download VirtualBox and a supported version of Ubuntu. Install VirtualBox and create a new virtual machine using the Ubuntu ISO.

Install VirtualBox guest additions

Guest additons lets you full screen the virtualised Ubuntu and have it use shortcuts that currently get handled by windows like alt+tab. Click the Devices->Install Guest Additions VirtualBox menu. Once restarted the full screen and seamless menu itens should be enabled.

Install some tools

Just some tools no one should be without.

sudo apt-get install git vim htop

Making VirtualBox fly

Your VBox might still be slow. Try running htop from the terminal, if it only has one CPU bar then you may need to enable virtualisation in your BIOS, which is pretty easy. The tutorial here. Once that's done, add more cores in the VBox system CPU settings.

Install Erlang

Install erlang using the following command from askubuntu...

sudo apt-get install erlang erlang-doc

This may install an old version but it's super quick and will get you up and running. Check that the install was successful...

erl

Install rebar

rebar is the maven of the erlang world, it can handle dependencies and standardises projects.

cd /usr/bin
wget https://github.com/rebar/rebar/wiki/rebar

The rebar command is now on your path, try testing it from your home directory...

cd ~
rebar

Installing Gnome 3

Ubuntu defaults to the Unity interface. While I quite liked the aesthetics and the usability wasn't a problem I couldn't get hardware acceleration to work, this made the interface extremely slow and the text quite blurry. Instead use Gnome 3, text is crisp and the UI is relatively snappy. Once installed using the instructions below, remember to enable 3D acceleration in the VirtualBox settings...

http://www.filiwiese.com/installing-gnome-on-ubuntu-12-04-precise-pangolin/

Install sublime text 2

There is patchy support (my opinion only) in IDEs for erlang so don't expect anything like JDT tooling, although we can still use powerful tools. sublime text is just one editor with plugins to support erlang.

Installing-Sublime-Text-2-on-Linux

SublimErl

SublimErl is the sublime text plugin for erlang, have a look at the project page for the feature list.

In sublime text click on the Preferenced->Browse Packages menu, this opens up a file explorer window. Right click on the Pacages button and copy the path, then in a terminal type cd , paste the path and press enter. Then use the following command...

git clone https://github.com/ostinelli/SublimErl.git

sublime text will automatically find this new plugin. There are a few things to remember when using SublimErl...

  • It only handles projects in the rebar format. In sublime text the project is the directory in the left hand pane, add a directory using the menu Project->Add Folder to Project...
  • SublimErl looks for an ebin directory or rebar.config file to identify the root dir of the project so make sure to call rebar compile in the project so it can be identified.
  • sublime text 2 packages are not like eclipse plugins, they are entirely hackable. If you are curious, open the python code for the plugin and put some print "Hello World" statements in there, sublime text will see the change instantly and hot-load the new code. You can see the output in the console, look for console in the cammand palette ctrl+shift+P.

Saturday, 30 March 2013

South Park Software License


If you have ever watched the show South Park then you will have probably read the disclaimer that is flashed at the start.  Here is my software license tribute:

All specifications and documentation for
this software--even those required for
customer sign off--are entirely fictional.
All code is tested... poorly.
The following program contains leaky
abstractions and should not be reused by anyone.
view raw SPL hosted with ❤ by GitHub

Remember that software development can often be much like an episode of South Park; constant swearing, youthful naivety and surprise endings.

Friday, 22 March 2013

Memories of Visual Basic 6

In the UK it is typical to study for two years and then have a placement year where you actually get a job before the final fourth year of study.  In 2006 I took on several small projects over the placement  year and pushed VB6 to it's limits.  VB6 has so many quirks, it is impossible not to use hacks to get things done.  Here are some of mine.


One tool required a DSL for interacting with phones, it would read a list of phone numbers and a file containing commands and run them over each of the numbers.  For example it would make a call to the phone and configure it using DTMF* tones.  I had no idea at that time how a compiler could be properly implemented so the resulting code was a complete mess and the DSL was looked like assembly for telephones.  Despite the hideous code, the program saved a lot of time.  To do this manually would have taken days instead of a couple of hours and be impossibly error prone.  One key missing feature was error handling, which is problematic in telecommunications.  Inevitably one of the calls would go wrong and the program would crash, the operator would then have to delete the completed phones numbers from the list and run the program again.  No problems!

Another project provided a UI for editing INI file configuration.  The program was great, except that VB does not allow more than 256 controls on a single form.  My 'ingenious' solution was to put each INI section in a tab pane which also had its own window.  When the user clicked a new tab, it hid the current window and showed a new window for that tab. 

VB6 also comes with it's own TCP control which you must drag onto the UI to instantiate.  The problem is that it had almost the same API as a serial connection control, meaning it only dealt with 1 to 1 connections.  This meant it was impossible to write a TCP server.  That is, until I worked out that an array of TCP controls waiting for connections worked pretty much like a TCP server.  This is OK except that an array has a finite capacity, I was again limited by the number of controls so the server could only ever handle a certain number of connections.

I remember the year, the work and the company fondly and hope that some of my work is still in use.  Looking back, I don't know why I used VB6 for everything.  It's just so easy to get started and then keep typing, I was young and naive, that's all I can say...

* DTMF tones are those strange sounds you hear when you press a number on a phone key pad.  Pieces of hardware such as phones and switches can interpret a sequence of tones as commands.

Tuesday, 25 December 2012

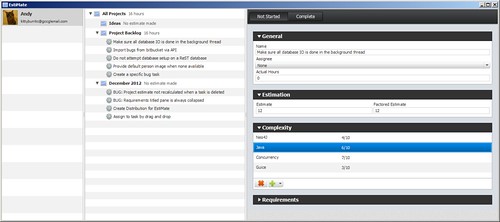
EstiMate, a software estimation tool

I have just open sourced a software application that I have been working on in my spare time for the past few months called EstiMate. This is my attempt to create some software which improves the way I can estimate a task and make what that estimate includes more transparent so that it is clear to others and Myself in the future. Areas which I feel are particularly important are:
  • Task complexity, how complex it the task and how confident is the assignee with that technology.
  • Quickly documenting what a task consists of and breaking it into smaller tasks
  • Having a history of past estimates and how they worked out.

There are many many more factors which affect estimation but these are the things that I want to implement first.

So, what does it do? At the moment it has some characteristics of an ERP application. You are able to add some projects, tasks and people to implement them. Tasks can be estimated and the sum of estimates are calculated for a project.

Complexity is taken into account which I think is a huge factor in any task. Tasks can be assigned "skill requirements" such as Java, SQL or anything you think you need and then can be rated out of ten. People can assign skills to themselves and rate themselves. If a task has skill requirements greater than those possessed by the assigned person then the estimate for a task is increased. I plan to improve this calculation by allowing the estimate to be increased by a percentage set in the project, instead of by a fixed number. Other factors affecting the time that a task can take will also be added.

Tasks can also be "templated", this means that the information entered for this task can be recreated. This is great for reoccurring tasks like builds, deployments or coding tasks that are very similar. It will allow these tasks to look similar and have a consistent base for estimation but be flexible and allow changes as needed. I plan to improve this to capture best practices such as including sub-tasks for testing or bug fixing that are percentages of the task estimate or perhaps even complexity.

EstiMate uses JavaFX for the frontend GUI and neo4j for data storage. It allows the user to keep a local database, to use a shared neo4j server or a neo4j database hosted on the Heroku platform. It is pure java and shouldn't need any set-up once I create an installer. At the moment, you can download the code from bitbucket and run it from your favourite IDE or command line (there might be a Maven hack there right now so be warned!).

It is licensed under GPLv3. I have blogged about some of the code I have written for this project so assume any code in this blog is free for you to use in any way you see fit without recourse to Me if it doesn't work of course!

If you have an idea or opinion or would like to contribute that would be great, feel free to comment here or tweet me @andy_till.

Monday, 24 December 2012

Dragging to resize a JavaFX Region

Here is another handy JavaFX utility to allow you to drag the bottom edge of a JavaFX Region to resize it. Layout containers inherit from Region although controls do not even though they both have a minHeight property so Controls cannot be resized using this class :(

import javafx.event.EventHandler;
import javafx.scene.Cursor;
import javafx.scene.input.MouseEvent;
import javafx.scene.layout.Region;
/**
* {@link DragResizer} can be used to add mouse listeners to a {@link Region}
* and make it resizable by the user by clicking and dragging the border in the
* same way as a window.
* <p>
* Only height resizing is currently implemented. Usage: <pre>DragResizer.makeResizable(myAnchorPane);</pre>
*
* @author atill
*
*/
public class DragResizer {
/**
* The margin around the control that a user can click in to start resizing
* the region.
*/
private static final int RESIZE_MARGIN = 5;
private final Region region;
private double y;
private boolean initMinHeight;
private boolean dragging;
private DragResizer(Region aRegion) {
region = aRegion;
}
public static void makeResizable(Region region) {
final DragResizer resizer = new DragResizer(region);
region.setOnMousePressed(new EventHandler<MouseEvent>() {
@Override
public void handle(MouseEvent event) {
resizer.mousePressed(event);
}});
region.setOnMouseDragged(new EventHandler<MouseEvent>() {
@Override
public void handle(MouseEvent event) {
resizer.mouseDragged(event);
}});
region.setOnMouseMoved(new EventHandler<MouseEvent>() {
@Override
public void handle(MouseEvent event) {
resizer.mouseOver(event);
}});
region.setOnMouseReleased(new EventHandler<MouseEvent>() {
@Override
public void handle(MouseEvent event) {
resizer.mouseReleased(event);
}});
}
protected void mouseReleased(MouseEvent event) {
dragging = false;
region.setCursor(Cursor.DEFAULT);
}
protected void mouseOver(MouseEvent event) {
if(isInDraggableZone(event) || dragging) {
region.setCursor(Cursor.S_RESIZE);
}
else {
region.setCursor(Cursor.DEFAULT);
}
}
protected boolean isInDraggableZone(MouseEvent event) {
return event.getY() > (region.getHeight() - RESIZE_MARGIN);
}
protected void mouseDragged(MouseEvent event) {
if(!dragging) {
return;
}
double mousey = event.getY();
double newHeight = region.getMinHeight() + (mousey - y);
region.setMinHeight(newHeight);
y = mousey;
}
protected void mousePressed(MouseEvent event) {
// ignore clicks outside of the draggable margin
if(!isInDraggableZone(event)) {
return;
}
dragging = true;
// make sure that the minimum height is set to the current height once,
// setting a min height that is smaller than the current height will
// have no effect
if (!initMinHeight) {
region.setMinHeight(region.getHeight());
initMinHeight = true;
}
y = event.getY();
}
}